Signs you need this
- • Holes from doorknobs, anchors, or furniture impacts
- • Cracks at seams — failed tape joints from age, settlement, or thermal movement
- • Random mid-panel cracks following no seam line
- • Nail or screw pops — a fastener pushing a visible bump through the paper face
- • Dents and dings from furniture, renovation, or everyday impact
- • Unpatched access holes left by plumbers, electricians, or HVAC contractors
- • Cracks running from the corners of window and door frames
- • Accumulated small damage that shows once a room is repainted
What the service involves
Drywall repair covers holes, cracks, nail pops, and failed seams — from a nail pop that needs filling to a doorknob hole that needs a backer and three coats to disappear. The method is the same at every scale: base coat in setting compound, paper tape embedded on any repair larger than a nail pop, two to three finish coats feathered well beyond the damage edge, sanded to the surrounding wall plane, and primed before handoff.
Why the mud schedule matters
Setting compound (Durabond or Easy Sand) is the right base material because it sets chemically and doesn’t shrink — it provides a dimensionally stable foundation for the finish coats. Topping compound goes on top: it’s workable, feathers smoothly, and sands easily, but it’s also the step most repairs fail at. One thick coat dries with a raised profile at the center. Three thin coats, each dried fully before the next, feather flat. The finish coats need to extend further from the damage edge than most contractors bother with — the transition between compound and original wall surface is what catches raking light. We sand and check under a low-angle work light before texture or primer goes on.
Paper tape vs. mesh tape
Paper tape embedded in the base coat is required on any patch larger than a nail pop. Mesh tape is fiberglass scrim — it goes on faster and holds itself in place, which is why some contractors use it. But mesh tape doesn’t hold compound the same way at a seam or structural repair, and it telegraphs through paint within a year on any repair that crosses a damage edge at an angle. We use paper tape in setting compound for every structural repair.
PVA primer before handoff
The prime coat is not optional. Joint compound absorbs paint at a different rate than the painted surface around it. Without PVA primer sealed over the repair, the patch reads as a lighter or darker spot after the first finish coat, regardless of how good the underlying patch is. We apply primer to the repair area before handoff. Your painter can put their finish coats directly on a primed surface.
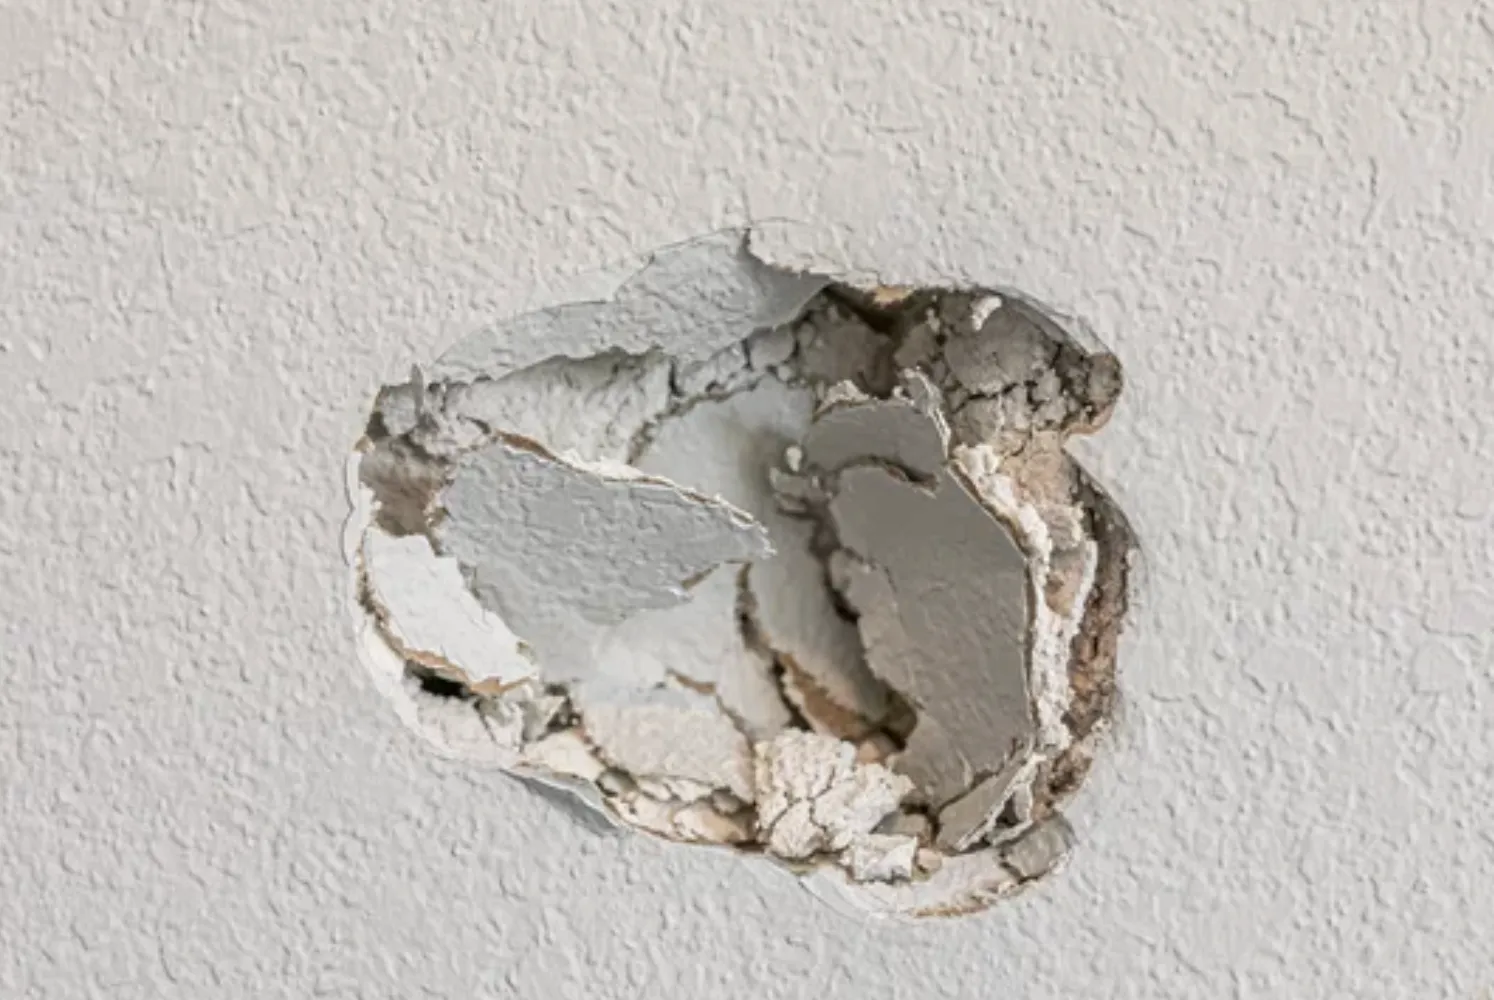
Patch size and what determines the approach
Small patches — nail pops, anchor holes, dents — need no backer; setting compound fills and feathers. Medium patches (6–12”) — doorknob holes, failed seam sections — require a backer clip or California patch method plus paper tape. Large patches (12–24”) may need metal backer or blocking, with possible return visits to allow proper dry time between coats. When damage covers more than roughly half a panel, or multiple adjacent patches are close together, full panel replacement often produces a better result and costs less than patching individual spots.
Plaster substrates in Stamford’s older homes
In Glenbrook, Springdale, and parts of the South End, original plaster over metal lath is common in homes from the 1950s and 1960s. Plaster patches behave differently than drywall at the joint — the substrate has different moisture behavior, the compound formulation needs to account for it, and the technique for blending with original plaster sheen requires adjustment. Many contractors don’t distinguish between drywall and plaster patching. We assess the substrate before touching the wall.
Texture matching
Smooth walls (Level 4) are straightforward to feather and sand. Walls with knockdown, orange peel, or hand-applied texture require sampling the existing texture and testing the match — spray pressure for sprayed textures, trowel approach for hand-applied finishes — against a low-visibility reference area before touching the patch. A texture mismatch is visible under any light that hits the wall at an angle, permanently.
When patching is the wrong call
If the damage source is water — a stain, soft spot, or bubbling from a prior leak — the board needs to come out, not just be patched over. Patching water-damaged drywall is wasted work if the paper face is compromised underneath. Similarly, if a wall has been patched multiple times over the years and the surface has too much accumulated variation to paint out evenly, skim coating the entire wall often produces a better result than patching individual spots — and costs less than addressing each one separately.
Materials & standards
Products & materials we use
- Durabond / Easy Sand (USG setting-type compound, base coat)
- Sheetrock All Purpose / Lightweight All Purpose (topping compound)
- USG Sheetrock (standard board)
- PVA drywall primer
Standards & codes we work to
- GA-216 finish levels (Level 4 / 5)
- CT DCP HIC registration
What the terms mean
- Paper tape vs. mesh tape
- Setting vs. topping compound
- Feathering / mud schedule
- California patch / backer clip method
- Plaster over lath
- Raking light
Options & variants
| Option | When it applies | Cost |
|---|---|---|
| Small patch (under 6 inches) | Nail pop, anchor hole, small dent — no backer needed | Low |
| Medium patch (6–12 inches) | Doorknob hole or failed seam — backer clip or California patch plus paper tape | Mid |
| Large patch (12–24 inches) | Access cut or larger impact — metal backer or blocking, full tape and bed | Higher |
| Full panel replacement | Damage exceeds ~50% of a panel, or multiple adjacent areas | Higher |
| Plaster patching | Original lath-and-plaster substrate — different compound and technique | Mid–high |
| Ceiling crack repair | Cracks at ceiling seams or mid-panel — overhead work | Mid–high |
What affects cost
- • Number and size of patches — the primary variable; one anchor hole versus six doorknob holes across three rooms.
- • Substrate type — drywall vs. original plaster-over-lath; plaster takes more time and different materials.
- • Wall vs. ceiling — overhead work adds labor regardless of patch size.
- • Texture matching — knockdown, orange peel, or hand-applied finishes take more skill and time than smooth walls.
- • Number of visits — multi-coat repairs may need a return visit when same-day dry time isn't possible.
- • Access and protection — furnished rooms, high ceilings, or tight spaces add setup time.
- • Pre-paint deadline — a painter already scheduled with a hard date can affect rush availability.
Price ranges
Low end
$100–$350
1–3 small patches, smooth wall, no texture match, single visit.
Typical
$250–$750
1–3 medium patches, texture match required, standard drywall substrate.
High end
$600–$1,800+
Multiple patches across rooms, plaster substrate, ceiling work, complex texture match, or a large patch needing two visits.
What to expect
- 1
On-site assessment
We walk every room, count the damage, identify the substrate (drywall vs. plaster), and check texture. We don't quote repair work sight-unseen.
- 2
Quote
Given on-site after the walkthrough; covers all patches identified. Hidden damage found while working is flagged before we touch it.
- 3
Prep
Protect flooring and adjacent surfaces; cut patches back to clean, sound edges — compound won't feather into torn paper.
- 4
Base coat and tape
Setting compound (Durabond or Easy Sand) fills and sets hard; paper tape — not mesh — embedded on any patch larger than a nail pop.
- 5
Finish coats
Two to three thin coats of topping compound, each dried fully, feathered well beyond the damage edge. We don't shortcut the mud schedule.
- 6
Sand
Sanded to the surrounding wall plane and checked under low-angle raking light before texture or primer.
- 7
Texture match
Existing texture sampled and tested against a low-visibility area before it touches the patch.
- 8
Prime
PVA primer over the repair before handoff — without it the patch reads lighter or darker after the first coat of paint.
- 9
Cleanup
Drop cloths out, surfaces clean.
When this isn’t the right call
- If the damage is from water → the board must come out and the source confirmed resolved; patching wet board is wasted work. See water damage drywall repair.
- If there are dozens of patches across a wall → skim coating the whole wall often costs less and looks better than patching each spot.
- If original plaster is failing broadly → widespread delamination or crumbling means the plaster system has failed; spot patches won't hold.
Frequently asked questions
How do I know if the patch will be visible after painting? +
A properly done patch won't be. The compound has to be feathered well beyond the damage edge, dried fully between coats, sanded to the exact plane of the surrounding wall, and primed before paint. The most common failure is a raised oval under raking light — one thick coat instead of three thin ones — and the second is skipping primer, which makes the repair read lighter or darker after the first coat. We don't skip either step.
Can you match my existing wall texture? +
Yes. Before touching the patch we sample the existing texture — spray pressure for orange peel or knockdown, trowel technique for hand-applied finishes — and test it against a low-visibility area until it reads identically under raking light. A mismatch is permanent and visible under any angled light. If the existing texture is too inconsistent to match, we'll tell you before we start.
What's the difference between mesh tape and paper tape, and why does it matter? +
Paper tape is correct for any structural patch. Mesh tape is fiberglass scrim — easier to apply, but it doesn't hold compound the same way on patches under stress and telegraphs through paint within a year on any repair that crosses a seam or damage edge. We use paper tape in setting compound for every patch larger than a nail pop.
My walls are original plaster, not drywall. Can you still patch them? +
Yes. Plaster over lath — common in Glenbrook, Springdale, Old Greenwich, and Cos Cob homes from the 1950s–70s — behaves differently at the joint and needs a different compound and technique to match sheen and texture. We assess the substrate before touching the wall. Many contractors treat plaster the same as drywall, which is why those patches crack or don't hold.
Do small repairs really require multiple coats? +
Yes — that's what makes the repair invisible. Joint compound shrinks as it dries; one thick coat leaves a raised profile visible under angled light. Three thin coats, each dried fully and feathered progressively wider, dry flat. It takes longer, but it's the only way the patch blends instead of telegraphing.
How long does the repair take, and will you need to come back? +
Most small-to-medium patches finish in one visit, with dry time between coats. Larger patches or texture-matching jobs get a return visit for the finish coats and texture for the best result. We'll tell you at the quote whether yours is a one- or two-visit repair.
Do I need to prime after drywall repair before painting? +
Always. Joint compound is porous and absorbs paint at a different rate than the surrounding wall, so without primer the repair shows as a lighter or darker spot even on a perfect patch. We apply PVA or drywall primer over the repair before handoff; your painter can put finish coats directly on it.
What's the difference between drywall repair and skim coating? When should I consider skim coating instead? +
Repair addresses specific damage — a hole, a failed seam, a nail pop. Skim coating is a full-surface treatment that restores a uniform finish across an entire wall or ceiling. Patching is right when damage is localized; skim coating makes more sense when a wall has been patched repeatedly and has too much variation to paint out evenly, or when patching each spot would cost more than skimming the whole wall.
My neighbor's contractor left a raised oval you can see whenever the sun hits the wall. Can that be fixed? +
Yes. That raised profile is a mudding failure — one thick coat instead of several thin ones, or compound not feathered far enough. The fix is to open the repair, sand down the high area, and redo the finish coats correctly. It's more work than doing it right the first time, but you don't have to live with it.